Monday, April 29, 2013

jamberry nail decals

happy monday!

i want to share a new product with all of you- jamberry nails!


a friend of mine at work had a perfectly manicured fingernail of a chevron print! so cute!

she told me it was a nail decal called jamberry- they have all different sizes and colors! the way it works is you cut out a piece to fit your fingernail, place it on, and use your hairdryer to seal it. then use a wooden nail stick to smooth out the decal for the perfect fit.

i was so excited about it, that she shared some samples with me and of course i had to try them out!

here's how it went:


now, the sample size was teeny-tiny, so i could only fit one on my pinky finger! i did not have a wooden nail stick... i would highly recommend using one since mine still had some bumps in it after it set. the decal lasted for about a week (probably because i couldn't stop smoothing out the bubbles every day and messing with the edges...), but my friend's lasted for 2 weeks! 

anyways, i think this is a great alternative to nail art- especially if you're trying to do the whole "paint an awesome design on your right hand using your left hand" which of course never looks as cool as you want it to look in the end. ;)

jamberry works sort of like a mary-kay where you have to order through a representative. head over to their website for more info!

have you tried any nail decals? would you recommend any?

Thursday, April 18, 2013

DIY Doily Collar Necklace


they're all the rage right now.

collar necklaces.

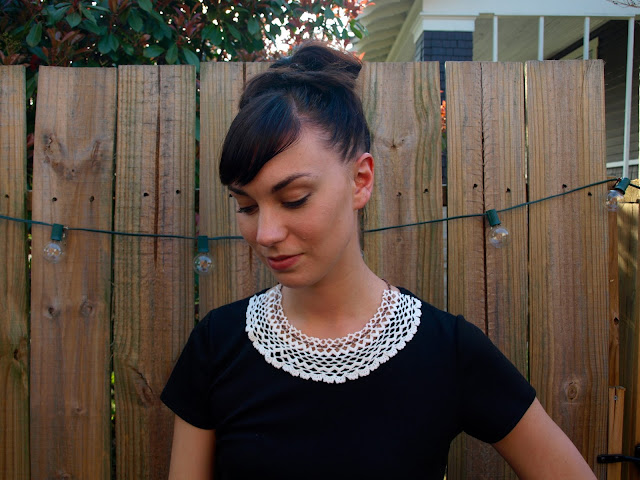
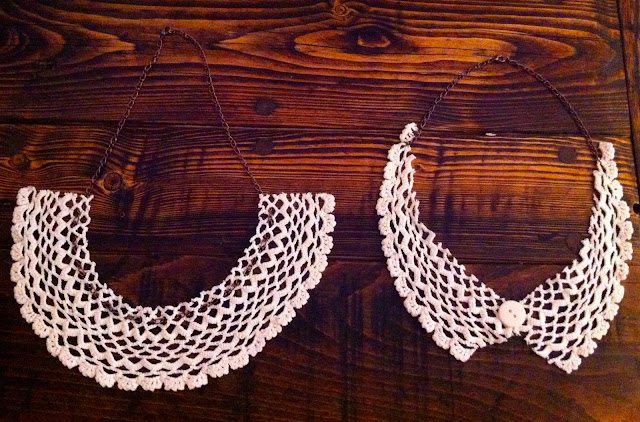
and what do you know- i came up with a way to make two necklaces with one doily. plus, you can style them 3 different ways! here's how to make 3-in-1 doily collar necklaces:

what you need:

1 doily
scissors
needle-nose pliers
necklace & bracelet chains (they come in one kit from joann's)
button
scrap fabric or felt
hot glue
glue gun

1) iron out your doily if it's a little wrinkly. this will help in lining up the pattern.


2) fold the doily in half. then trace & cut out a collar pattern onto the doily.


3) next, take the bracelet chain and separate the chain in the very middle- opposite of the hook - with the needle-nose pliers.


4) using the pliers, reattach each end of the loose chain to the ends of the collar pieces.


 5) now, fasten the front of the collar with a button. cut out a piece of fabric or felt the same size as the button. place the button on top of the doily and the fabric underneath and glue them all together.


6) pair the necklace with a cute top and enjoy!


DIY Doily Collar Necklace


now, you can use the rest of the doily to make yet another doily necklace!

1) use the other end of the doily and cut out a C shape. be sure to stay along the crochet lines.


2) open up the necklace chain and weave it in and out of the top part of the doily.


3) now, there are 2 ways you can wear this necklace...


DIY Doily Collar Necklace


like this, or like this...


DIY Doily Collar Necklace


DIY Doily Collar Necklace


have fun with your new necklaces! feel free to pin & share with friends! <3

Monday, April 15, 2013

DIY Tulle Skirt: How to Make a Tulle Skirt


it was love at first sight.
fabric love.

while browsing joann's lovely fabrics, i came across this beautiful pink polka dot tulle fabric and knew exactly what i wanted to make out of it: a tulle skirt.


i've made one skirt in the past with a hidden zipper, but this time i wanted to make a skirt with an elastic waist.

i'm not going to lie, i wrestled with this fabric along with the lining and elastic, but after many re-dos and learning experiences, i'm very happy with the way it turned out!

i followed along with the tutorial from cotton & curls, but after making some mistakes here and there, here is my own adapted version.


what you need:
  • sewing machine
  • 1 1/2-2 yards of tulle fabric
  • 1/12-2 yards of lining (i used a silky fabric close to the color of the tulle)
  • thread to match your fabric
  • elastic band- enough to go around your waist
  • scissors or rotary tool & mat (this was the first time i used mine!)
  • pins

1) measure your waist where you want your skirt to sit. then take the measurements hip/3.14/2=radius. this measurement will now be the radius (from middle to edge) of your skirt waist.

2) fold your fabric in half and measure and mark a half circle with the radius measurement from the fold. from there, determine how long you want your skirt to be and add about two inches. measure from the end of the radius measurement out onto the rest of your fabric and mark it all around creating a half circle (this will be the length of your skirt). 


3) using scissors or your rotary cutter, cut along the lines you drew on the tulle. use the same measurements, but add about an inch and a half to the bottom of the lining. (note: in my photos i made my lining fit my waist while i made the tulle waist bigger for gathering. i would not recommend doing this as it makes the sewing process a lot harder!)

4) now, take your elastic around your waist and stretch it a bit to fit around your waist and sew the ends together. if you leave the elastic loose, the skirt will be too big. in essence, the unstretched elastic should be a few inches shorter than your actual waist size.

5) once your fabric is cut out, line lining and fabric up while stretching the elastic and start pinning everything together like so. Then continue to pin more all around the waist:


6) turn the skirt inside out so you can sew all 3 together along the very top of the skirt while stretching the fabric (this is the hard part!). once you have done this, fold the elastic down so the elastic is covered by the fabric. sew with a zig-zag stitch along the bottom part of the elastic while stretching it- catching the elastic with fabric on the zig and only the fabric of the skirt on the zag. 

7) finally, while your skirt is still inside-out, fold the lining up twice all along the bottom to match up with length of the bottom of the tulle and pin all around. hem lining all around the bottom. turn back right side out, try it on, and admire your diy tulle skirt! :)

once you've made your skirt, feel free to send me photos! i'd love to see your creations!

what sewing projects have you worked on lately?

Monday, April 8, 2013

sentimental heart

hey everyone,

it's been quite some time since i updated, but it doesn't mean that my mind has strayed away from diys and fashion inspiration...

one of the main reasons it's been a little hard to come back is due to the fact that my great-grandma (nana) passed away in december. she was my main inspiration for this blog and even the name the modernette came from a story she told me. you can read more in my about section. she had a wonderful life living to her mid-90s, and i only hope to carry on her legacy through my own creativity - blogging or not.

(photo by dawn roscoe)


but hey- she wouldn't want me or anyone else to be sad. so here's the good news:

i have so many new crazy ideas for this blog that my brain (and notes app on my phone) is bursting!

after some reflection, i am not too thrilled with the direction i was taking the blog. it's fun to dream and all, but one of my pet-peeves in the blogging world is when the blog becomes more about fantasy than reality. sure it's fun to dream and i'll post a few inspiration posts here and there to keep up on trends, but you can begin to go down a path with wanting & wishing- not cool.

what can you start to see with the new modernette?

-diy posts (yay!)
-affordable looks and ways to make look-alikes for less.
-and more surprises!

cheers to being back!
-aly